

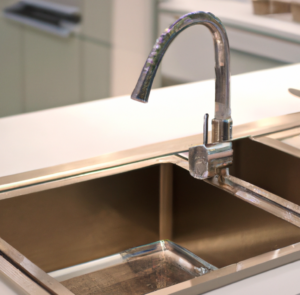
How To Tighten A Loose Kitchen Faucet
If there's i important feature of the kitchen faucet, it's helping to command the amount of water flowing from your sink. And so having a loose kitchen faucet can go from being a fiddling niggling headache to a real big problem if non nipped in the bud.
The good thing is that fixing kitchen plumbing issues like this tin be easy to exercise. You don't take to call a plumber for tiny bug similar this. And you don't likewise need to take amazing plumbing skills to tighten a kitchen faucet.
In this guide, yous'll know the reason your kitchen tap becomes wobbly and how to fix the problem.
What Are The Causes of A Wobbly or Loose Faucet?
Working in the kitchen with a wobbly kitchen faucet can be really annoying and burdensome. And even later on tightening the faucet, they can come loose over again. "So why does my kitchen faucet keep coming loose?" you may be asking. Hither are the reasons:
- Loose screws: The kitchen faucet base and head are held in identify by a bolt that'southward under the sink. When the nuts that secure the commodities come loose, the faucet will become wobbly. This is a result of the threads of the nuts condign damaged.
- Loose faucet base: Due to excessive utilize, the faucet handles that are attached to the base could loosen upwardly. And this can result in a loose base, wobbly kitchen tap, and leaks. A loose base tin also cause the water lines to rupture.
- Worn-out O-rings: The O-rings secure the kitchen faucet handles in their correct position. After extended usage, the O-rings can wear out and go loose. This volition also result in a wobbly kitchen tap.

7 Piece of cake Steps to Fix Loose Kitchen Faucets Base at Home
Now we know the reasons our kitchen faucets come up off, here's how to repair a loose kitchen faucet. But offset, we're going to be needing some tools to piece of work with. Tools you'll need to tighten a loose kitchen faucet base.
- Basin wrench
- A flashlight
- Hand gloves
- Mini Knife
At present permit's get to work.
Step ane: Empty everything under the kitchen sink cabinet
If you lot're like most people, you use your sink cabinet to shop some tools, cleaning products, and a couple of other stuff. Since your kitchen faucet nut is stationed under the sink, y'all'll desire to remove all the objects and items you store at that place to gain access to underneath your sink. As a prophylactic precaution, yous'll want to make clean the bottom a bit so you don't get then many dusty particles on yourself. And if you have stained kitchen cabinets, and so add a protective layer on the outside as well as y'all don't want to become the stain or chiffonier door damaged. And if you don't accept that precaution, you'll accept to then repair the damaged kitchen chiffonier door too. And you'll likewise want to clean the upper surface so you lot don't become clay on your face.
Pace 2: Turn off the water valves
Side by side up, you've got to turn off the water valves nether the sink. There are normally 2 types of water supply lines; common cold water valve and hot water valve. You lot've got to do this before you begin looking for the nut and fixing the loose kitchen faucet. This is a precautionary measure out to ensure you don't get yourself drenched in water should the piping burst or anything else go wrong.
Step 3: Slide under the sink and detect the nut
At present slide into the empty sink cabinet on your back, and plow your flashlight on. And then locate the commodities on the roof of the chiffonier. The position of commodities should exist directly nether the kitchen faucet base. This is the nut that you lot will tighten.
Step 4: Set the basin wrench to the right size
In one case yous've located the faucet bolt, ready the size of your (adaptable) wrench to the right size of the nut securing the faucet in place.
Stride 5: Time to tighten the nut
Firmly braze the basin wrench to the nut and plough it in a clockwise direction to tighten the nut. You may have a petty challenge doing this as you might have to twist your body into awkward positions to practise this. Effort non to over-tighten the nut then you don't make it slip over the commodities. However, that doesn't mean you should under-tighten information technology. Just go on to tighten the nut till you lot tin can feel it tin can't be moved farther.
Step 6: Bank check that the faucet base of operations is tight
When yous're done tightening the bolt, come out from under the sink to check if the kitchen faucet is tight or if information technology still moves around.
Step 7: Plow the water supply dorsum on and restore the items y'all brought out
Once you've confirmed that the loose kitchen faucet has been repaired, supervene upon all the items you lot moved out of the way at the showtime of this fun DIY tighten a kitchen faucet projection. Wasn't it so much more fun when your only concern was how to choose a kitchen faucet ?!. Wasn't it so much more fun when your only business was how to cull a kitchen faucet ?!. However, it's possible to tighten kitchen faucets and still feel like the faucets are wobbly. In this scenario, we'll explore another solution: how to tighten a loose faucet handle.
How to Tighten a Loose Kitchen Faucet Handle at Home
If your kitchen faucets don't work properly later tightening them, let's check if the issue can exist solved by tightening the faucet handle.
Tools yous'll demand to DIY a loose kitchen faucet handle
- Flathead screwdriver or knife
- Flashlight
- Hex head wrench (Allen wrench or key)
- Philips head screwdriver
Steps to Easily Tighten Kitchen Faucet Handle
Pace one: Empty everything in the sink cabinet
First things commencement: remove all the items in the sink cabinet so you tin embark on the work.
Step 2: Turn off the h2o supply valves
To avoid soaking yourself with h2o should anything break or become wrong, turn off the h2o supply valves.
This will besides prevent water from gushing out when you lot turn the kitchen faucet on. So as a safety precaution, always turn the water valves off.
Pace iii: Identify the kind of faucet you have
Some kitchen faucets are secured with a hex head screw: many others are secured with a Philips head spiral.
But if yous can't detect the spiral head, you'll have to take out the decorative cap in the handle to observe the kind of screw you have.
To remove the decorative cap in the handle, you'll have to slide the edge of your flathead screwdriver or knife under the cap and popular it open.
Step 4: Tighten the screw
The manner you'll tighten the screw depends on the type of screw in your faucet handle.
If the ready screw is located at the base of the handle, use your hex head wrench (Allen wrench) to tighten it by turning it clockwise.
And if the set spiral is underneath a decorative encompass, employ your hex wrench or Philips head screwdriver to tighten the kitchen faucet handle accordingly. Hold the faucet handle in position and spiral it in a clockwise manner.
Caveat: the reason we closed the water supply valves before we began to piece of work is that, when using a hex wrench, you lot might need to plow on your faucet handle.

Step five: Cheque that the kitchen faucet handle is stable
When yous're washed screwing, it's time to check if you've done perfect work.
Check that the faucet is firmly fixed and no longer moves from its position. If this is the case, your work is done here.
Step six: Replace the decorative cap, other items, and turn on the water
When you're sure the faucet is securely fixed, put the decorative cap dorsum on and replace the items you lot took out of the way.
And and so the water supply valves back on.
At present yous've learned to tighten a wobbly or loose kitchen faucet by yourself. And if the issue persists, you'll have to contact a professional.
On the occasion y'all've got a single-handle kitchen faucet, here's how to tighten it and prepare leaks.
How Do Y'all Tighten A Dual Handle or Single Handle Kitchen Faucet?
To embark on this easy DIY project, you'll need a few tools;
- Allen fundamental or hex head wrench
- Safe seals
- Screwdriver
- Piping wrench
- Old toothbrush
- New O-band
- Heatproof silicone plumber's grease
Now, these are the steps to tighten a single-handle kitchen faucet at home.
Step 1: Turn off the water supply lines
The h2o supply lines are below the sink: plough them off by turning the handle on the valves clockwise.
And if yous tin't notice them, turn off the main h2o supply channel.
Pace 2: Remove the handle lever
Screws are mostly used to attach the handles of faucets to the faucet cartridge. And sometimes, a decorative cap is used to hibernate the screw.
Remove the cap and unscrew it with a hex head wrench or an Allen wrench. And then gently accept out the kitchen faucet handle.
Step 4: Accept out the disc cartridge
One time the handle has come off, it will not be hard to locate the ceramic disc cartridge.
Remove the disc cartridge with pliers and check for leaks.
And if the cartridge is bad, it is amend to supersede it than repair it.
Step 5: Clean and reassemble the handle kitchen faucet
The cartridge has got rubber seals that can start leaking due to mineral depositions.
Remove them gently and clean them with an old toothbrush. And you would exist better off ownership new ones if they're cleaved.
Also, check if the O-ring is damaged. If it is, likewise replace it with new ones or use silicone grease to coat information technology.
In one case you lot're washed cleaning and replacing the damaged parts, reassemble the faucet and tighten the screws.
Stride six: Restore the h2o supply lines
When you're done and accept fabricated sure all the screws are tight, turn the water valves back on, and your single-handle kitchen faucet is fix for use.
Conclusion
Embarking on whatever of these DIY projects could take anywhere from effectually thirty – 45 minutes to undertake. Plus it's like shooting fish in a barrel to do: so do you actually want to call your plumber for that?
I don't call up so. That's not to say you shouldn't contact your plumber if you don't have time on your hands.
All we're saying is y'all can solve the problem by yourself and save yourself some money past following our guide today.
Source: https://kitcheninfinity.com/home-diy-project-how-to-tighten-kitchen-faucet-easily/
0 Response to "How To Tighten A Loose Kitchen Faucet"
Post a Comment